轻松实现 Chrome 网页截图插件:完整指南
Chrome 插件在现代浏览器的使用中扮演了至关重要的角色。它们不仅可以增强浏览体验,还能提供各种实用功能,从广告拦截到网页翻译,再到开发者工具。通过安装不同的插件,用户可以根据自己的需求定制浏览器,使其更符合个人或工作使用习惯。
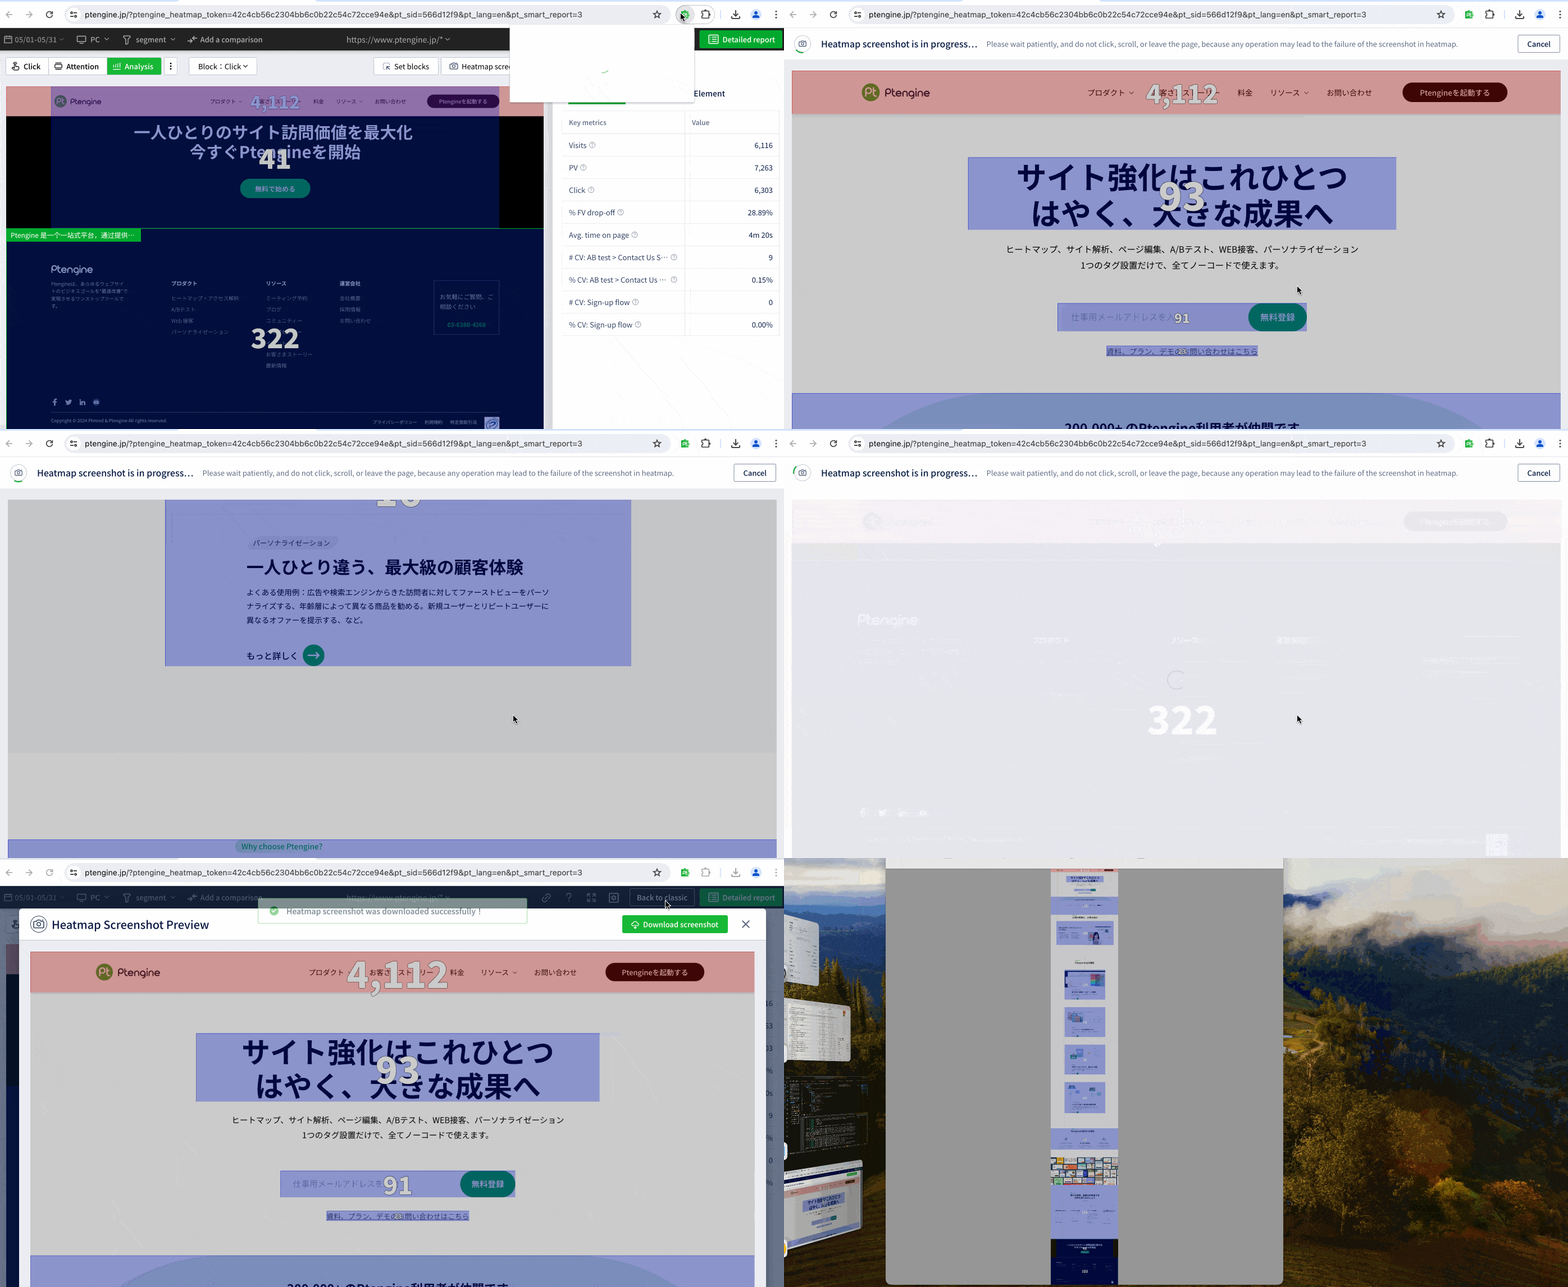
近期,Ptengine 在其 Chrome 插件 Ptengine-Assistant 中新增了一个热图截图功能,方便用户完整地截取热图页面,并直接下载到本地文件。这一新功能极大地方便了用户的日常操作,提升了工作效率。本文将通过一个具体示例,逐步展示如何实现一个类似的截图插件。相信看完后,你也能轻松实现自己的截图插件。
一、准备工作
首先,我们需要创建一个Chrome插件的文件夹。通常包括以下几个文件:
capture-extention
	- manifest.json 插件的配置文件
	- popup.html    插件的弹出页面
    - popup.js      用于控制弹出页面的脚本
	- content.js    插入到目标标签页的脚本, 能够直接操作页面内容,并与后台脚本进行通信
	- background.js 后台脚本,用于处理插件的逻辑
	- icons
		- capture16.png
		- capture48.png
		- capture128.png
capture-extention
- manifest.json 插件的配置文件
- popup.html 插件的弹出页面
- popup.js 用于控制弹出页面的脚本
- content.js 插入到目标标签页的脚本, 能够直接操作页面内容,并与后台脚本进行通信
- background.js 后台脚本,用于处理插件的逻辑
- icons
- capture16.png
- capture48.png
- capture128.png二、创建项目文件
1. 创建manifest.json
这是Chrome插件的配置文件,描述了插件的基本信息和所需权限。内容如下:
// manifest.json
{
    "manifest_version": 3,
    "name": "Page Screenshot",
    "version": "1.0",
    "description": "A Chrome extension to capture page screenshots",
    "permissions": ["activeTab", "scripting", "tabs"],
    "action": {
        "default_popup": "popup.html",
        "default_icon": {
            "16": "icons/capture16.png",
            "48": "icons/capture48.png",
            "128": "icons/capture128.png"
        }
    },
    "background": {
        "service_worker": "background.js",
        "type": "module"
    },
    "content_scripts": [
        {
            "matches": ["<all_urls>"],
            "js": ["content.js"]
        }
    ],
    "icons": {
        "16": "icons/capture16.png",
        "48": "icons/capture48.png",
        "128": "icons/capture128.png"
    }
}
// manifest.json
{
"manifest_version": 3,
"name": "Page Screenshot",
"version": "1.0",
"description": "A Chrome extension to capture page screenshots",
"permissions": ["activeTab", "scripting", "tabs"],
"action": {
"default_popup": "popup.html",
"default_icon": {
"16": "icons/capture16.png",
"48": "icons/capture48.png",
"128": "icons/capture128.png"
}
},
"background": {
"service_worker": "background.js",
"type": "module"
},
"content_scripts": [
{
"matches": ["<all_urls>"],
"js": ["content.js"]
}
],
"icons": {
"16": "icons/capture16.png",
"48": "icons/capture48.png",
"128": "icons/capture128.png"
}
}2. 创建popup.html
这是插件的弹出页面,用户点击插件图标时显示的界面:
<!-- popup.html -->
<!doctype html>
<html lang="en">
    <head>
        <meta charset="UTF-8" />
        <meta name="viewport" content="width=device-width, initial-scale=1.0" />
        <title>Page Screenshot</title>
        <style>
            *,
            ::after,
            ::before {
                box-sizing: border-box;
                margin: 0;
                padding: 0;
            }
            body {
                margin: 0;
                min-width: 328px;
                padding: 24px;
                box-shadow: 0 0 2px 2px #000;
                background: linear-gradient(to bottom, #70cf77, #00a92e);
            }
            body {
                margin: 0;
                min-width: 328px;
                padding: 24px;
                box-shadow: 0 0 2px 2px #091e42;
            }
            .capture_container {
                font-size: 14px;
                color: #091e42;
                padding: 20px 8px;
            }
            .capture_type {
                display: flex;
                align-items: center;
                justify-content: space-between;
                padding: 10px 0 4px;
                border-bottom: 1px solid #dfe1e6;
                margin-top: 4px;
            }
            .capture_button {
                padding: 0 16px;
                height: 24px;
                line-height: 24px;
                font-size: 12px;
                cursor: pointer;
                background-color: #00a92e;
                color: #ffffff;
                border-radius: 4px;
                border: none;
                outline: none;
            }
        </style>
    </head>
    <body>
        <h1>Screenshot Demo</h1>
        <div class="capture_container">
            <p class="capture_type">
                <span>Page Screenshot</span>
                <button id="capture" class="capture_button">Capture</button>
            </p>
        </div>
        <script src="popup.js"></script>
    </body>
</html>
<!-- popup.html -->
<!doctype html>
<html lang="en">
<head>
<meta charset="UTF-8" />
<meta name="viewport" content="width=device-width, initial-scale=1.0" />
<title>Page Screenshot</title>
<style>
*,
::after,
::before {
box-sizing: border-box;
margin: 0;
padding: 0;
}
body {
margin: 0;
min-width: 328px;
padding: 24px;
box-shadow: 0 0 2px 2px #000;
background: linear-gradient(to bottom, #70cf77, #00a92e);
}
body {
margin: 0;
min-width: 328px;
padding: 24px;
box-shadow: 0 0 2px 2px #091e42;
}
.capture_container {
font-size: 14px;
color: #091e42;
padding: 20px 8px;
}
.capture_type {
display: flex;
align-items: center;
justify-content: space-between;
padding: 10px 0 4px;
border-bottom: 1px solid #dfe1e6;
margin-top: 4px;
}
.capture_button {
padding: 0 16px;
height: 24px;
line-height: 24px;
font-size: 12px;
cursor: pointer;
background-color: #00a92e;
color: #ffffff;
border-radius: 4px;
border: none;
outline: none;
}
</style>
</head>
<body>
<h1>Screenshot Demo</h1>
<div class="capture_container">
<p class="capture_type">
<span>Page Screenshot</span>
<button id="capture" class="capture_button">Capture</button>
</p>
</div>
<script src="popup.js"></script>
</body>
</html>3.创建popup.js
这个脚本处理用户点击弹出页面上截图按钮后的逻辑:
// popup.js
// 给capture按钮绑定点击事件,发送截图请求到content.js
document.getElementById('capture').addEventListener('click', () => {
    chrome.tabs.query({ active: true, currentWindow: true }, tabs => {
        chrome.tabs.sendMessage(tabs[0].id, { action: 'capture' });
    });
});
// popup.js
// 给capture按钮绑定点击事件,发送截图请求到content.js
document.getElementById('capture').addEventListener('click', () => {
chrome.tabs.query({ active: true, currentWindow: true }, tabs => {
chrome.tabs.sendMessage(tabs[0].id, { action: 'capture' });
});
});4.创建content.js
这个脚本用于在目标标签页中接收消息并执行截图操作:
// content.js
// 监听到popup.js发出的截图请求
chrome.runtime.onMessage.addListener((request, sender, sendResponse) => {
    if (request.action === 'capture') {
        // 发送截图请求到background.js后台脚本
        chrome.runtime.sendMessage({ action: 'capture' }, response => {
            if (chrome.runtime.lastError) {
                // 错误处理
                console.error(chrome.runtime.lastError.message);
            } else {
                // 得到截图结果并展示
                displayScreenshot(response.screenshotUrl);
            }
        });
    }
});

function displayScreenshot(url, scale) {
    const img = document.createElement('img');
    img.src = url;
    img.classList.add('screenshot');
    img.style.position = 'fixed';
    img.style.top = '10px';
    img.style.right = '10px';
    img.style.zIndex = 2147483647;
    img.style.border = '2px solid #ccc';
    img.style.transform = `scale(${scale})`;
    img.style.transformOrigin = 'right top';
    img.style.boxShadow = 'rgba(0, 0, 0, 0.3) 0px 0px 5px';
    document.body.appendChild(img);
}
// content.js
// 监听到popup.js发出的截图请求
chrome.runtime.onMessage.addListener((request, sender, sendResponse) => {
if (request.action === 'capture') {
// 发送截图请求到background.js后台脚本
chrome.runtime.sendMessage({ action: 'capture' }, response => {
if (chrome.runtime.lastError) {
// 错误处理
console.error(chrome.runtime.lastError.message);
} else {
// 得到截图结果并展示
displayScreenshot(response.screenshotUrl);
}
});
}
});
function displayScreenshot(url, scale) {
const img = document.createElement('img');
img.src = url;
img.classList.add('screenshot');
img.style.position = 'fixed';
img.style.top = '10px';
img.style.right = '10px';
img.style.zIndex = 2147483647;
img.style.border = '2px solid #ccc';
img.style.transform = `scale(${scale})`;
img.style.transformOrigin = 'right top';
img.style.boxShadow = 'rgba(0, 0, 0, 0.3) 0px 0px 5px';
document.body.appendChild(img);
}5.创建background.js
这个脚本用于处理截图请求并发送截图结果到popup.js:
// background.js
// 监听来自popup.js和content.js发送的截图请求
chrome.runtime.onMessage.addListener((request, sender, sendResponse) => {
    if (request.action === 'capture') {
        // 执行截图功能
        chrome.tabs.captureVisibleTab(null, { format: 'png' }, image => {
            // 截图完成,发送响应给content.js
            sendResponse({ screenshotUrl: image });
        });
        return true;
    }
});
// background.js
// 监听来自popup.js和content.js发送的截图请求
chrome.runtime.onMessage.addListener((request, sender, sendResponse) => {
if (request.action === 'capture') {
// 执行截图功能
chrome.tabs.captureVisibleTab(null, { format: 'png' }, image => {
// 截图完成,发送响应给content.js
sendResponse({ screenshotUrl: image });
});
return true;
}
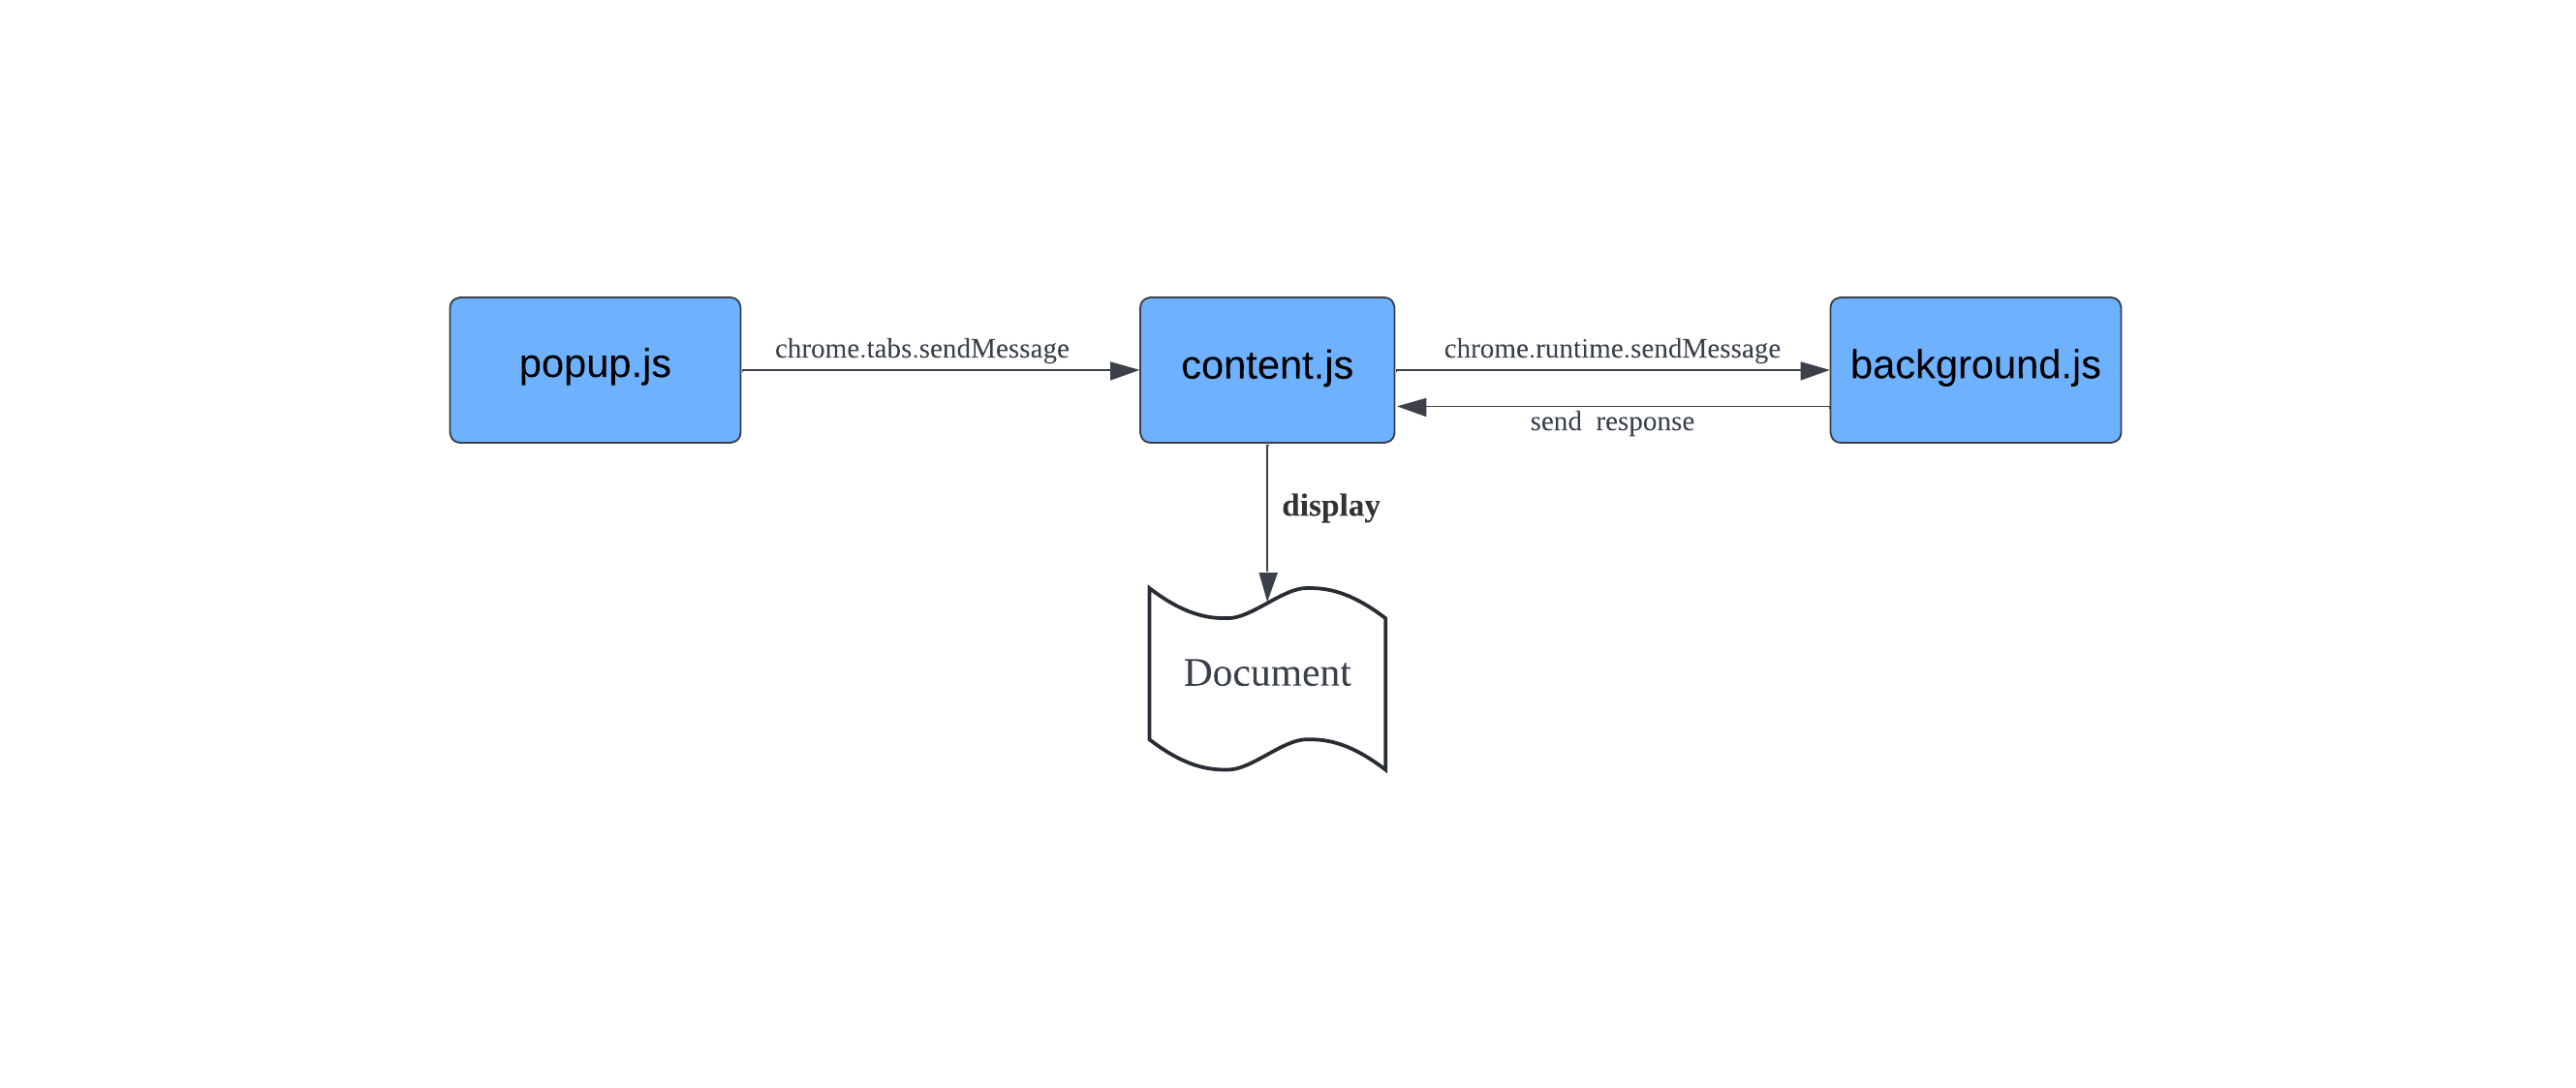
});上述代码的逻辑处理流程如下图:
三、运行插件
- 打开Chrome浏览器,进入
chrome://extensions/。 - 打开开发者模式。
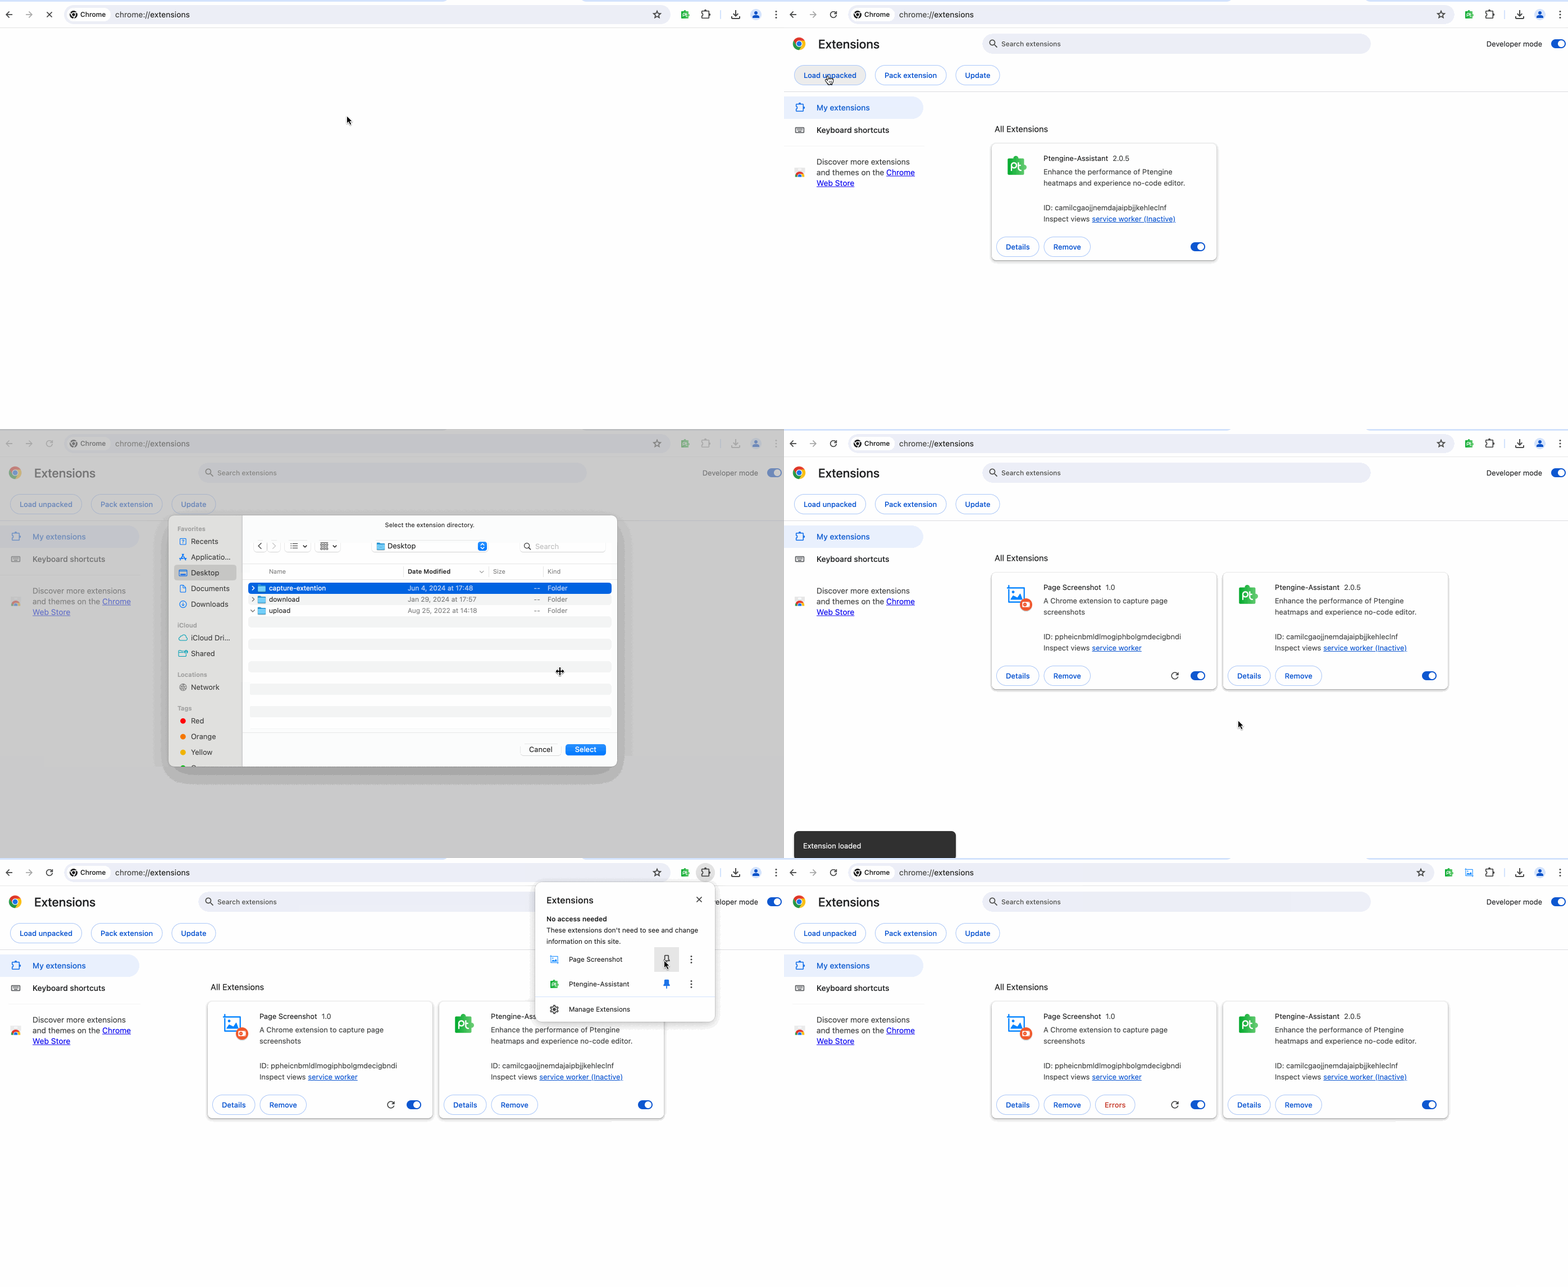
- 点击“加载已解压的扩展程序”按钮,选择项目的根文件夹。 加载插件后,你会在浏览器工具栏看到插件的图标。
四、实际使用
点击插件图标,会弹出popup页面,点击弹出页面上的“Capture”按扭,当前页面的截图会被捕获并显示在页面的右上角。
至此,一个简单的chrome截图插件就完成了。效果如下图所示: 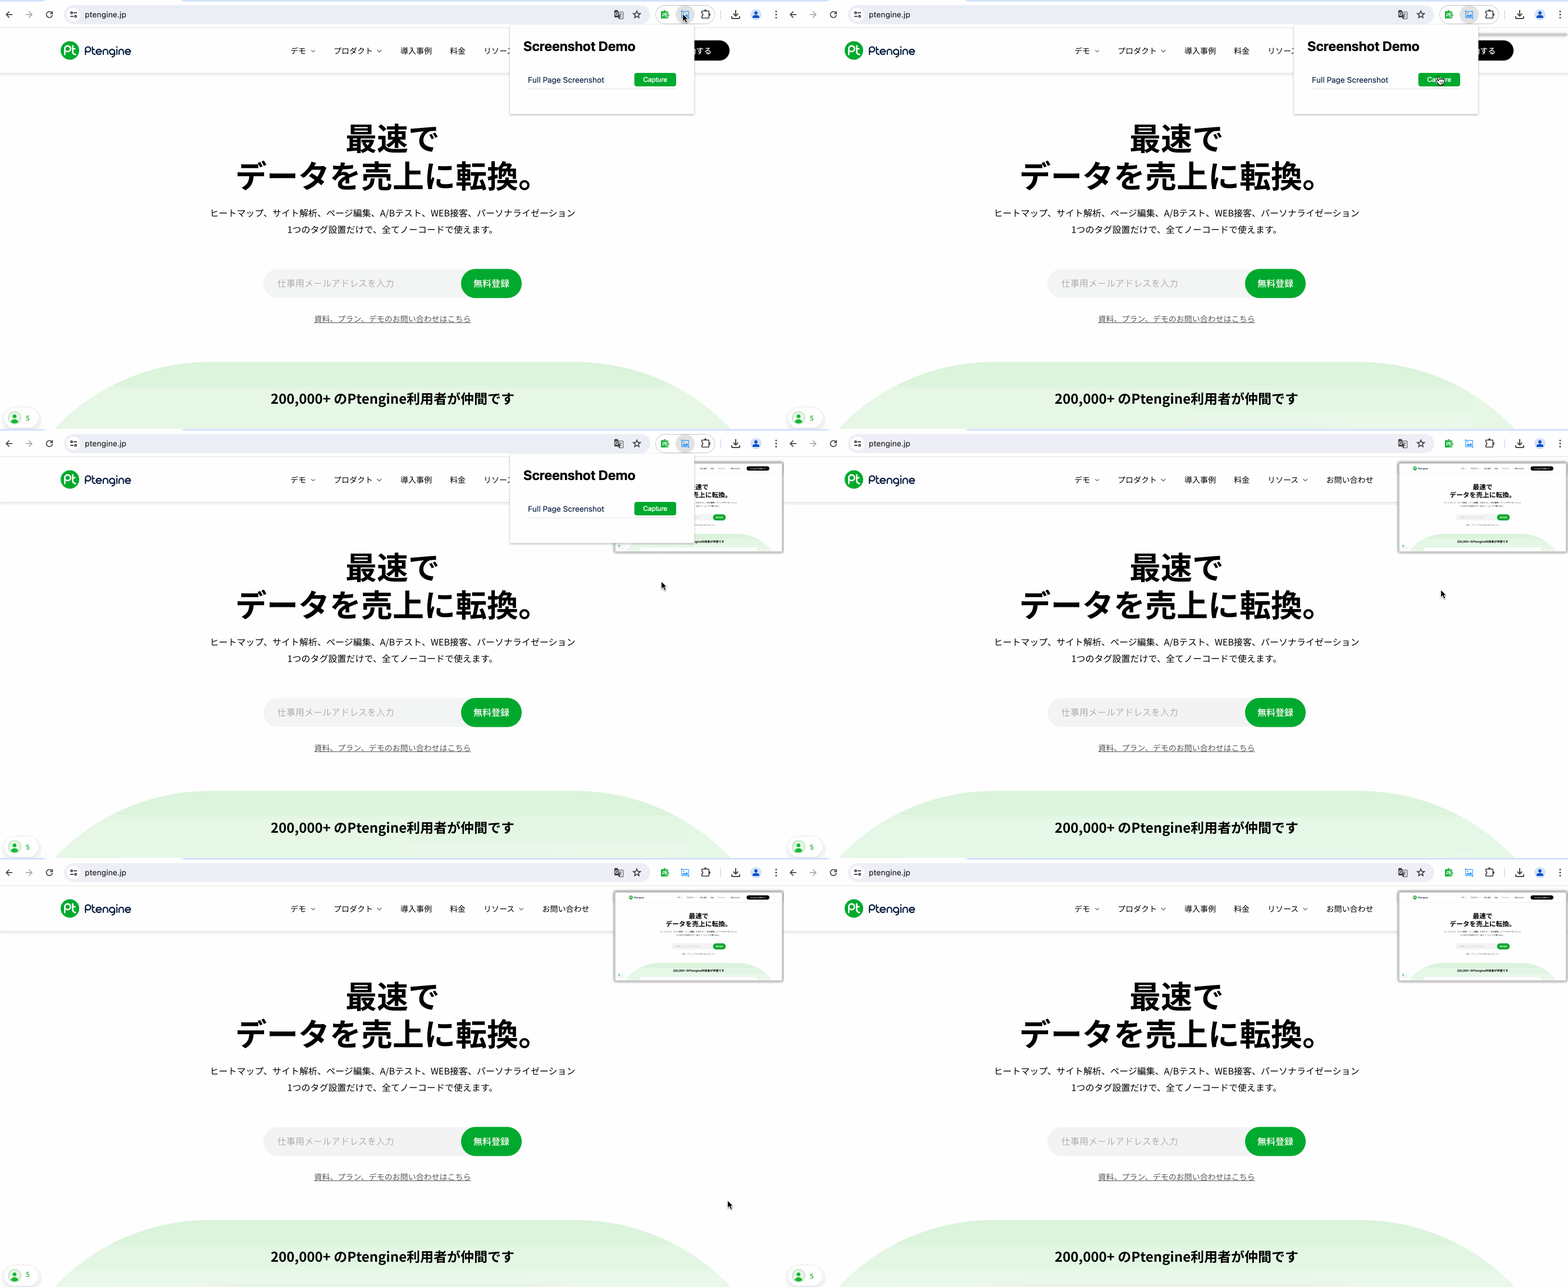
五、遇到的问题
在完成上述步骤后,你可能会发现,之前已经打开的标签页中使用此插件进行截图时并没有生效。这是因为安装插件后,content.js脚本并没有自动插入到已经打开的所有标签页中
解决方案:
为了确保content.js能够在所有标签页中生效,我们可以在用户点击插件图标时,主动将 content.js脚本插入到当前标签页中。为此,只需在popup.js中添加以下代码:
// popup.js
// 注入content.js到当前标签页
chrome.tabs.query({ active: true, currentWindow: true }, tabs => {
    // Tips:使用scripting方法需要再manifest.json中的permissions里加上此选项
    chrome.scripting.executeScript({
        target: { tabId: tabs[0].id },
        files: ['content.js']
    });
});
// popup.js
// 注入content.js到当前标签页
chrome.tabs.query({ active: true, currentWindow: true }, tabs => {
// Tips:使用scripting方法需要再manifest.json中的permissions里加上此选项
chrome.scripting.executeScript({
target: { tabId: tabs[0].id },
files: ['content.js']
});
});这样,当用户点击插件图标时,content.js脚本就会被插入到当前标签页中,从而确保所有标签页都能使用此插件进行截图。
你可能还会发现另一个问题:目前获取到的截图只是页面的当前可视区域,而不是整个页面。那么,如何才能截取到页面的完整截图呢?由于 Chrome 自带的截图功能只能截取当前可视区域,我们可以通过滚动页面、逐段截图,直到页面底部,然后将所有截图拼接成一张完整的图片。接下来,我们来扩展一下上面的示例,实现滚动截图的功能。
六、滚动截图
1.修改popup.html
<!-- popup.html -->
<h1>Screenshot Demo</h1>
<div class="capture_container">
    <p class="capture_type">
        <span>Full Page Screenshot</span>
        <button id="capture" class="capture_button">Capture</button>
    </p>
    <!-- 新增滚动截图按钮 -->
    <p class="capture_type">
        <span>Scrolling Screenshot</span>
        <button id="scrolling_capture" class="capture_button">Capture</button>
    </p>
</div>
<!-- popup.html -->
<h1>Screenshot Demo</h1>
<div class="capture_container">
<p class="capture_type">
<span>Full Page Screenshot</span>
<button id="capture" class="capture_button">Capture</button>
</p>
<!-- 新增滚动截图按钮 -->
<p class="capture_type">
<span>Scrolling Screenshot</span>
<button id="scrolling_capture" class="capture_button">Capture</button>
</p>
</div>2. 修改popup.js
// popup.js
// 新增滚动截图按钮的点击事件绑定
document.getElementById('scrolling_capture').addEventListener('click', () => {
    chrome.tabs.query({ active: true, currentWindow: true }, tabs => {
        chrome.tabs.sendMessage(tabs[0].id, { action: 'scrolling_capture' });
    });
});
// popup.js
// 新增滚动截图按钮的点击事件绑定
document.getElementById('scrolling_capture').addEventListener('click', () => {
chrome.tabs.query({ active: true, currentWindow: true }, tabs => {
chrome.tabs.sendMessage(tabs[0].id, { action: 'scrolling_capture' });
});
});3.修改content.js
chrome.runtime.onMessage.addListener((request, sender, sendResponse) => {
    if(request.action === 'capture'){
        chrome.runtime.sendMessage({ action: 'capture' },(response) => {
            if(chrome.runtime.lastError){
                console.error(chrome.runtime.lastError.message);
            }else {
                displayScreenshot(response.screenshotUrl);
            }
        });
    }else if(request.action === 'scrolling_capture'){
		    // 监听滚动截图请求消息的,并做出相应的处理
        captureScrollingScreenshot();
    }
});

// 滚动截屏的核心逻辑
async function captureScrollingScreenshot() {
		hideScrollBar(); // 开始之前先隐藏滚动条
    const totalHeight = document.documentElement.scrollHeight; // 页面总高度
    const viewportHeight = window.innerHeight; // 当前浏览器可视窗口高度
    let currentPosition = 0; // 当前截屏的起始高度
    let screenshots = [];    // 用于存放所有分屏截图的列表
    while(currentPosition < totalHeight) {
		    await new Promise(resolve => setTimeout(resolve, 500));
        window.scrollTo(0, currentPosition);
        await new Promise(resolve => setTimeout(resolve, 500)); // 等待滚动完成

        const screenshotUrl = await new Promise(resolve => {
		        // 给后台程序 background.js 发送截图请求
            chrome.runtime.sendMessage({ action: 'capture'}, (response) => {
                resolve(response.screenshotUrl);
             });
        });
				// 把当前屏的截图放入数组中
        screenshots.push(screenshotUrl);

        currentPosition += viewportHeight;
    };
    // 截图完成后滚动条恢复到页面顶部
    window.scrollTo(0,0);
		showScrollBar();
    // 把分屏截取下来的截图列表 用canvas拼接成一张图片
    combineScreenshots(screenshots, totalHeight, viewportHeight);
}

//拼接截图方法
function combineScreenshots(screenshots, totalHeight, viewportHeight) {
		const devicePixelRatio = window.devicePixelRatio;
    const canvas = document.createElement('canvas');
    const ctx = canvas.getContext('2d');
    canvas.width = document.documentElement.clientWidth;
    canvas.height = totalHeight;

    let y = 0;
    screenshots.forEach((screenshotUrl) => {
        const img = new Image();
        img.src = screenshotUrl;
        img.onload = () => {
            ctx.drawImage(img, 0,y, img.width / devicePixelRatio, img.height / devicePixelRatio);
            y += viewportHeight;
            if(y >= totalHeight) {
                const finalImg = canvas.toDataURL();
                const scale = viewportHeight / y;
                displayScreenshot(finalImg, scale);
            }
        }
    })
}


// 隐藏滚动条,防止每屏的截图上面出现滚动条
function hideScrollBar() {
    document.documentElement.style.overflow = 'hidden';
}

// 截图完毕后 恢复滚动条显示
function showScrollBar() {
    document.documentElement.style.overflow = '';
}chrome.runtime.onMessage.addListener((request, sender, sendResponse) => {
if(request.action === 'capture'){
chrome.runtime.sendMessage({ action: 'capture' },(response) => {
if(chrome.runtime.lastError){
console.error(chrome.runtime.lastError.message);
}else {
displayScreenshot(response.screenshotUrl);
}
});
}else if(request.action === 'scrolling_capture'){
// 监听滚动截图请求消息的,并做出相应的处理
captureScrollingScreenshot();
}
});
// 滚动截屏的核心逻辑
async function captureScrollingScreenshot() {
hideScrollBar(); // 开始之前先隐藏滚动条
const totalHeight = document.documentElement.scrollHeight; // 页面总高度
const viewportHeight = window.innerHeight; // 当前浏览器可视窗口高度
let currentPosition = 0; // 当前截屏的起始高度
let screenshots = []; // 用于存放所有分屏截图的列表
while(currentPosition < totalHeight) {
await new Promise(resolve => setTimeout(resolve, 500));
window.scrollTo(0, currentPosition);
await new Promise(resolve => setTimeout(resolve, 500)); // 等待滚动完成
const screenshotUrl = await new Promise(resolve => {
// 给后台程序 background.js 发送截图请求
chrome.runtime.sendMessage({ action: 'capture'}, (response) => {
resolve(response.screenshotUrl);
});
});
// 把当前屏的截图放入数组中
screenshots.push(screenshotUrl);
currentPosition += viewportHeight;
};
// 截图完成后滚动条恢复到页面顶部
window.scrollTo(0,0);
showScrollBar();
// 把分屏截取下来的截图列表 用canvas拼接成一张图片
combineScreenshots(screenshots, totalHeight, viewportHeight);
}
//拼接截图方法
function combineScreenshots(screenshots, totalHeight, viewportHeight) {
const devicePixelRatio = window.devicePixelRatio;
const canvas = document.createElement('canvas');
const ctx = canvas.getContext('2d');
canvas.width = document.documentElement.clientWidth;
canvas.height = totalHeight;
let y = 0;
screenshots.forEach((screenshotUrl) => {
const img = new Image();
img.src = screenshotUrl;
img.onload = () => {
ctx.drawImage(img, 0,y, img.width / devicePixelRatio, img.height / devicePixelRatio);
y += viewportHeight;
if(y >= totalHeight) {
const finalImg = canvas.toDataURL();
const scale = viewportHeight / y;
displayScreenshot(finalImg, scale);
}
}
})
}
// 隐藏滚动条,防止每屏的截图上面出现滚动条
function hideScrollBar() {
document.documentElement.style.overflow = 'hidden';
}
// 截图完毕后 恢复滚动条显示
function showScrollBar() {
document.documentElement.style.overflow = '';
}到此,我们已经实现了滚动截图的功能。让我们来看看效果吧。 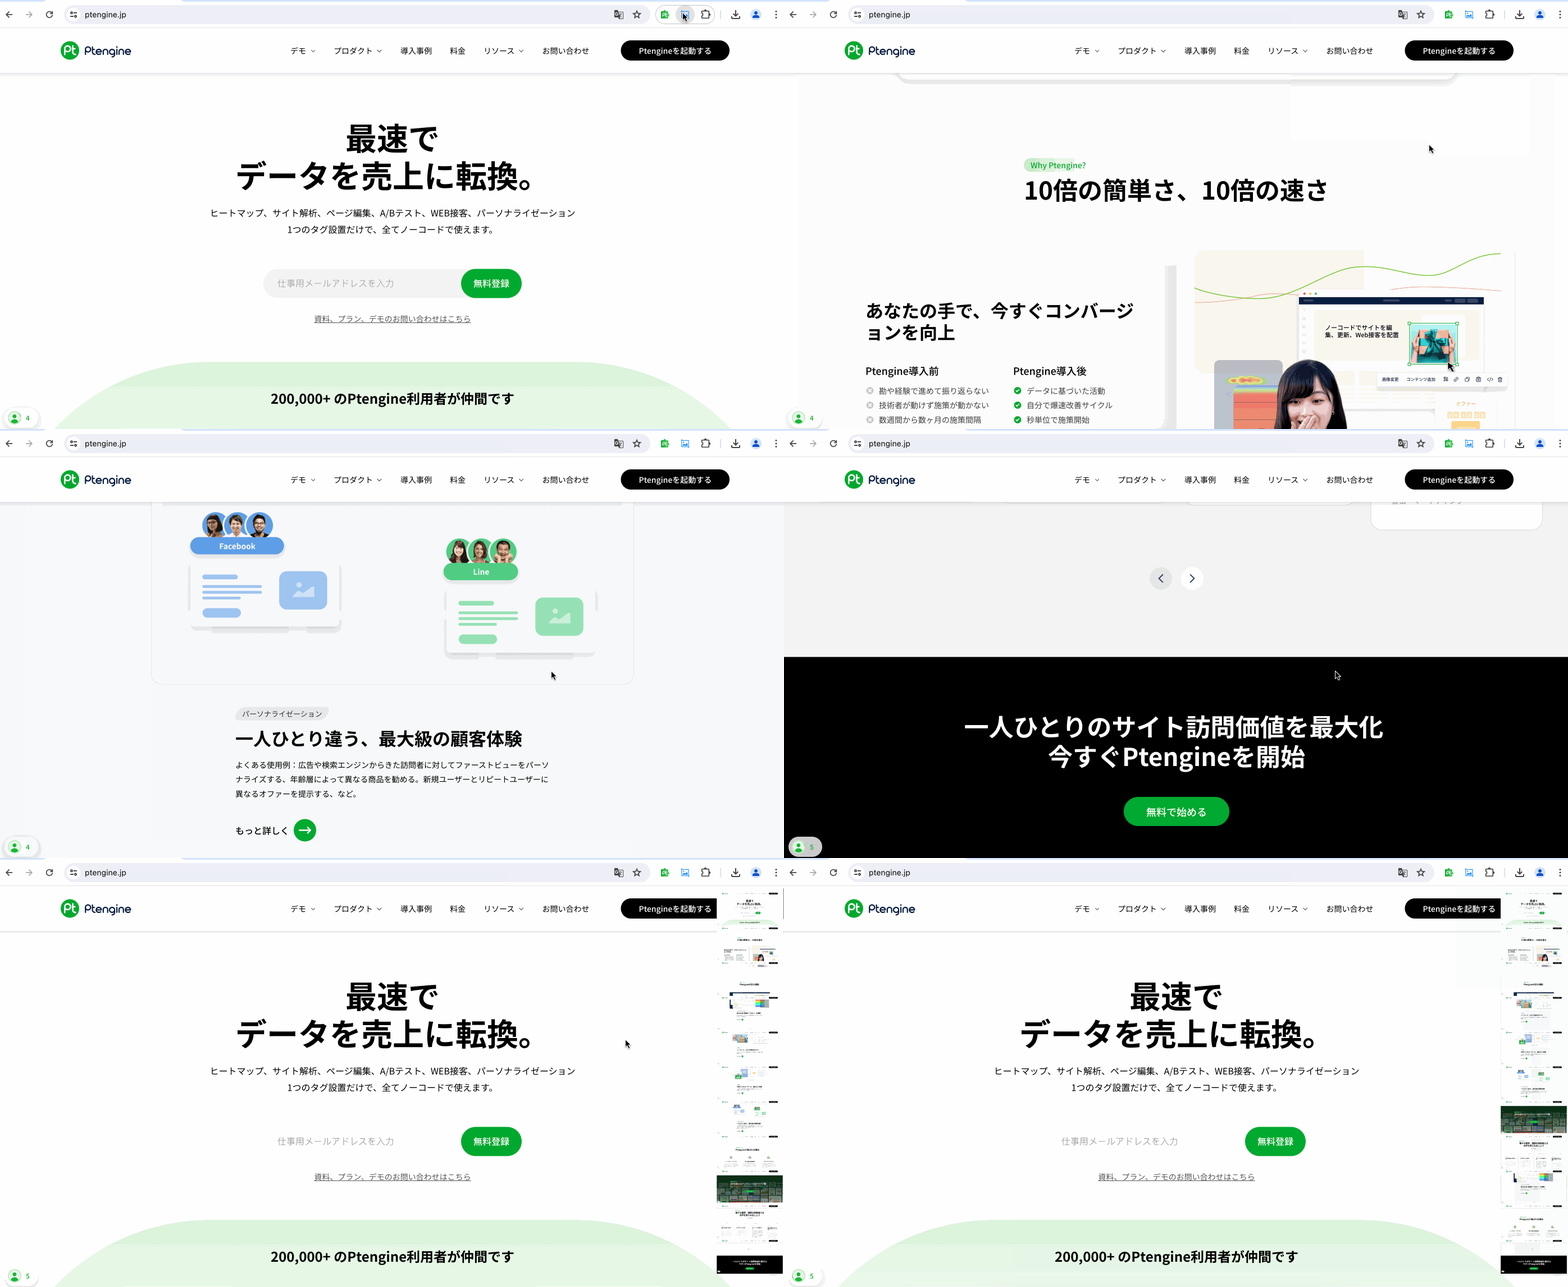
虽然现在确实能够截取到页面的完整高度,但每块儿截图中都会包含一个固定的头部栏。为了解决这个问题,我们需要在滚动截图过程中暂时隐藏头部固定元素,并在截图完成后再将其恢复显示。
4. 头部固定栏特殊处理
// content.js
// 查找头部固定栏
function findFixedHeader() {
    let fixedElement = null;
    const elements = document.body.querySelectorAll('*');
    for (let i = 0; i < elements.length; i++) {
        const element = elements[i];
        const { position } = window.getComputedStyle(element);
        const { top } = element.getBoundingClientRect();
        if (['fixed', 'sticky'].includes(position) && top < window.innerHeight) {
            fixedElement = element;
            break;
        }
    }
    return fixedElement;
}

async function captureScrollingScreenshot() {
    const totalHeight = document.documentElement.scrollHeight;
    const viewportHeight = window.innerHeight;
    let currentPosition = 0;
    let screenshots = [];
    const fixedHeader = findFixedHeader(); // 查找头部固定栏
    const { display } = (fixedHeader && window.getComputedStyle(fixedHeader)) || {};
    while (currentPosition < totalHeight) {
        await new Promise(resolve => setTimeout(resolve, 500));
        // 当前不是第一屏的时候且有固定头部时
        if (currentPosition > 0 && fixedHeader) {
            // 隐藏固定头部
            fixedHeader.style.display = 'none';
        }

        window.scrollTo(0, currentPosition);
        await new Promise(resolve => setTimeout(resolve, 500));

        const screenshotUrl = await new Promise(resolve => {
            chrome.runtime.sendMessage({ action: 'capture' }, response => {
                resolve(response.screenshotUrl);
            });
        });

        screenshots.push(screenshotUrl);

        currentPosition += viewportHeight;
    }
    window.scrollTo({
        left: 0,
        top: 0,
        behavior: 'smooth'
    });

    // 截图完毕后恢复固定头部元素显示
    if (fixedHeader && display) {
        fixedHeader.style.display = display;
    }

    // Combine screenshots into one image
    combineScreenshots(screenshots, totalHeight, viewportHeight);
}
// content.js
// 查找头部固定栏
function findFixedHeader() {
let fixedElement = null;
const elements = document.body.querySelectorAll('*');
for (let i = 0; i < elements.length; i++) {
const element = elements[i];
const { position } = window.getComputedStyle(element);
const { top } = element.getBoundingClientRect();
if (['fixed', 'sticky'].includes(position) && top < window.innerHeight) {
fixedElement = element;
break;
}
}
return fixedElement;
}
async function captureScrollingScreenshot() {
const totalHeight = document.documentElement.scrollHeight;
const viewportHeight = window.innerHeight;
let currentPosition = 0;
let screenshots = [];
const fixedHeader = findFixedHeader(); // 查找头部固定栏
const { display } = (fixedHeader && window.getComputedStyle(fixedHeader)) || {};
while (currentPosition < totalHeight) {
await new Promise(resolve => setTimeout(resolve, 500));
// 当前不是第一屏的时候且有固定头部时
if (currentPosition > 0 && fixedHeader) {
// 隐藏固定头部
fixedHeader.style.display = 'none';
}
window.scrollTo(0, currentPosition);
await new Promise(resolve => setTimeout(resolve, 500));
const screenshotUrl = await new Promise(resolve => {
chrome.runtime.sendMessage({ action: 'capture' }, response => {
resolve(response.screenshotUrl);
});
});
screenshots.push(screenshotUrl);
currentPosition += viewportHeight;
}
window.scrollTo({
left: 0,
top: 0,
behavior: 'smooth'
});
// 截图完毕后恢复固定头部元素显示
if (fixedHeader && display) {
fixedHeader.style.display = display;
}
// Combine screenshots into one image
combineScreenshots(screenshots, totalHeight, viewportHeight);
}代码更新完成后,让我们再来试一下效果:
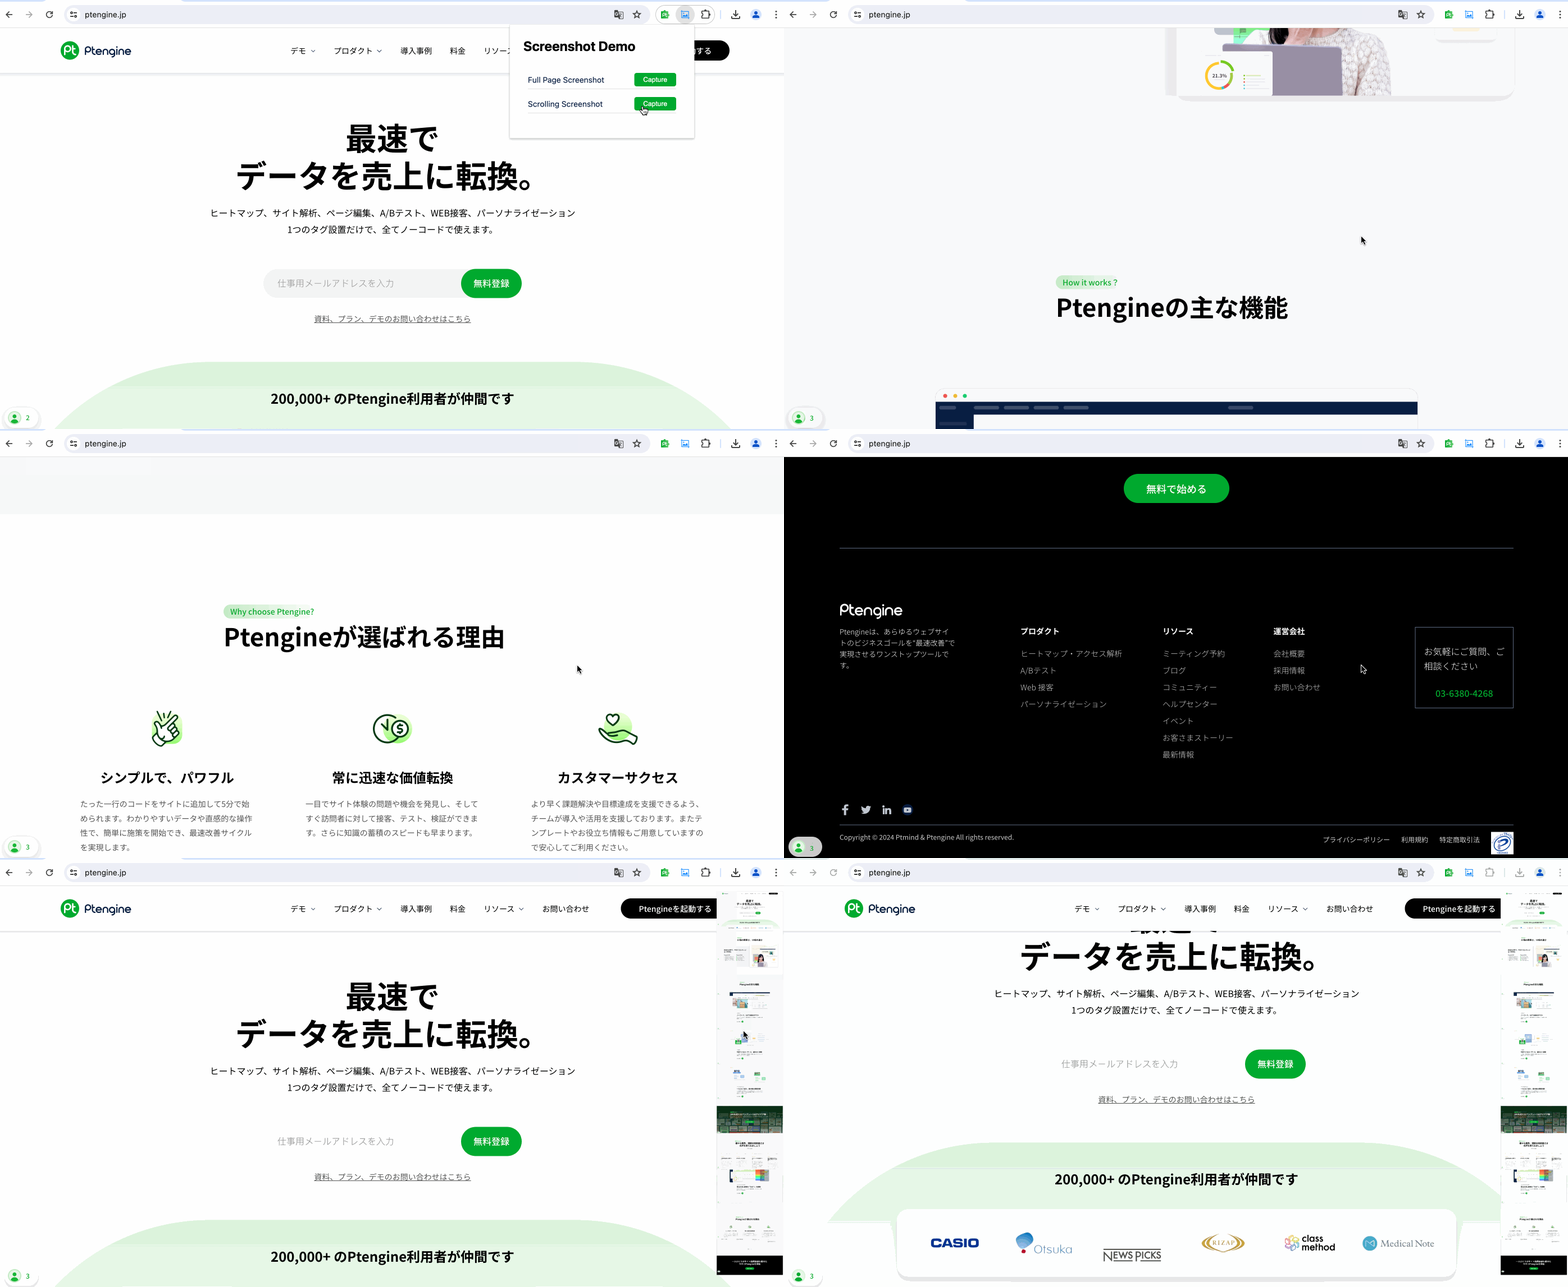
七、截图下载功能
到目前为止,我们已经实现了一个简单的网页截图插件,并且能够支持滚动截图和头部固定栏的特殊处理。接下来,我们再添加一个下载功能,将截图保存到本地。
1. 修改popup.html
// content.js
// 新增下载方法
function downloadImage(url) {
    const a = document.createElement('a');
    a.href = url;
    a.download = 'screenshot.png';
    a.style.display = 'none';
    document.body.appendChild(a);
    a.click();
    document.body.removeChild(a);
}

function displayScreenshot(url) {
    const img = document.createElement('img');
    img.src = url;
    img.classList.add('screenshot');
    img.style.width = '300px';
    img.style.position = 'fixed';
    img.style.top = '10px';
    img.style.right = '10px';
    img.style.zIndex = 2147483647;
    img.style.border = '2px solid #ccc';
    img.style.boxShadow = 'rgba(0, 0, 0, 0.3) 0px 0px 5px';
    document.body.appendChild(img);
    // 展示3秒后,自动下载到本地
    setTimeout(() => {
        document.body.removeChild(img);
        downloadImage(url);
    }, 3000);
}
// content.js
// 新增下载方法
function downloadImage(url) {
const a = document.createElement('a');
a.href = url;
a.download = 'screenshot.png';
a.style.display = 'none';
document.body.appendChild(a);
a.click();
document.body.removeChild(a);
}
function displayScreenshot(url) {
const img = document.createElement('img');
img.src = url;
img.classList.add('screenshot');
img.style.width = '300px';
img.style.position = 'fixed';
img.style.top = '10px';
img.style.right = '10px';
img.style.zIndex = 2147483647;
img.style.border = '2px solid #ccc';
img.style.boxShadow = 'rgba(0, 0, 0, 0.3) 0px 0px 5px';
document.body.appendChild(img);
// 展示3秒后,自动下载到本地
setTimeout(() => {
document.body.removeChild(img);
downloadImage(url);
}, 3000);
}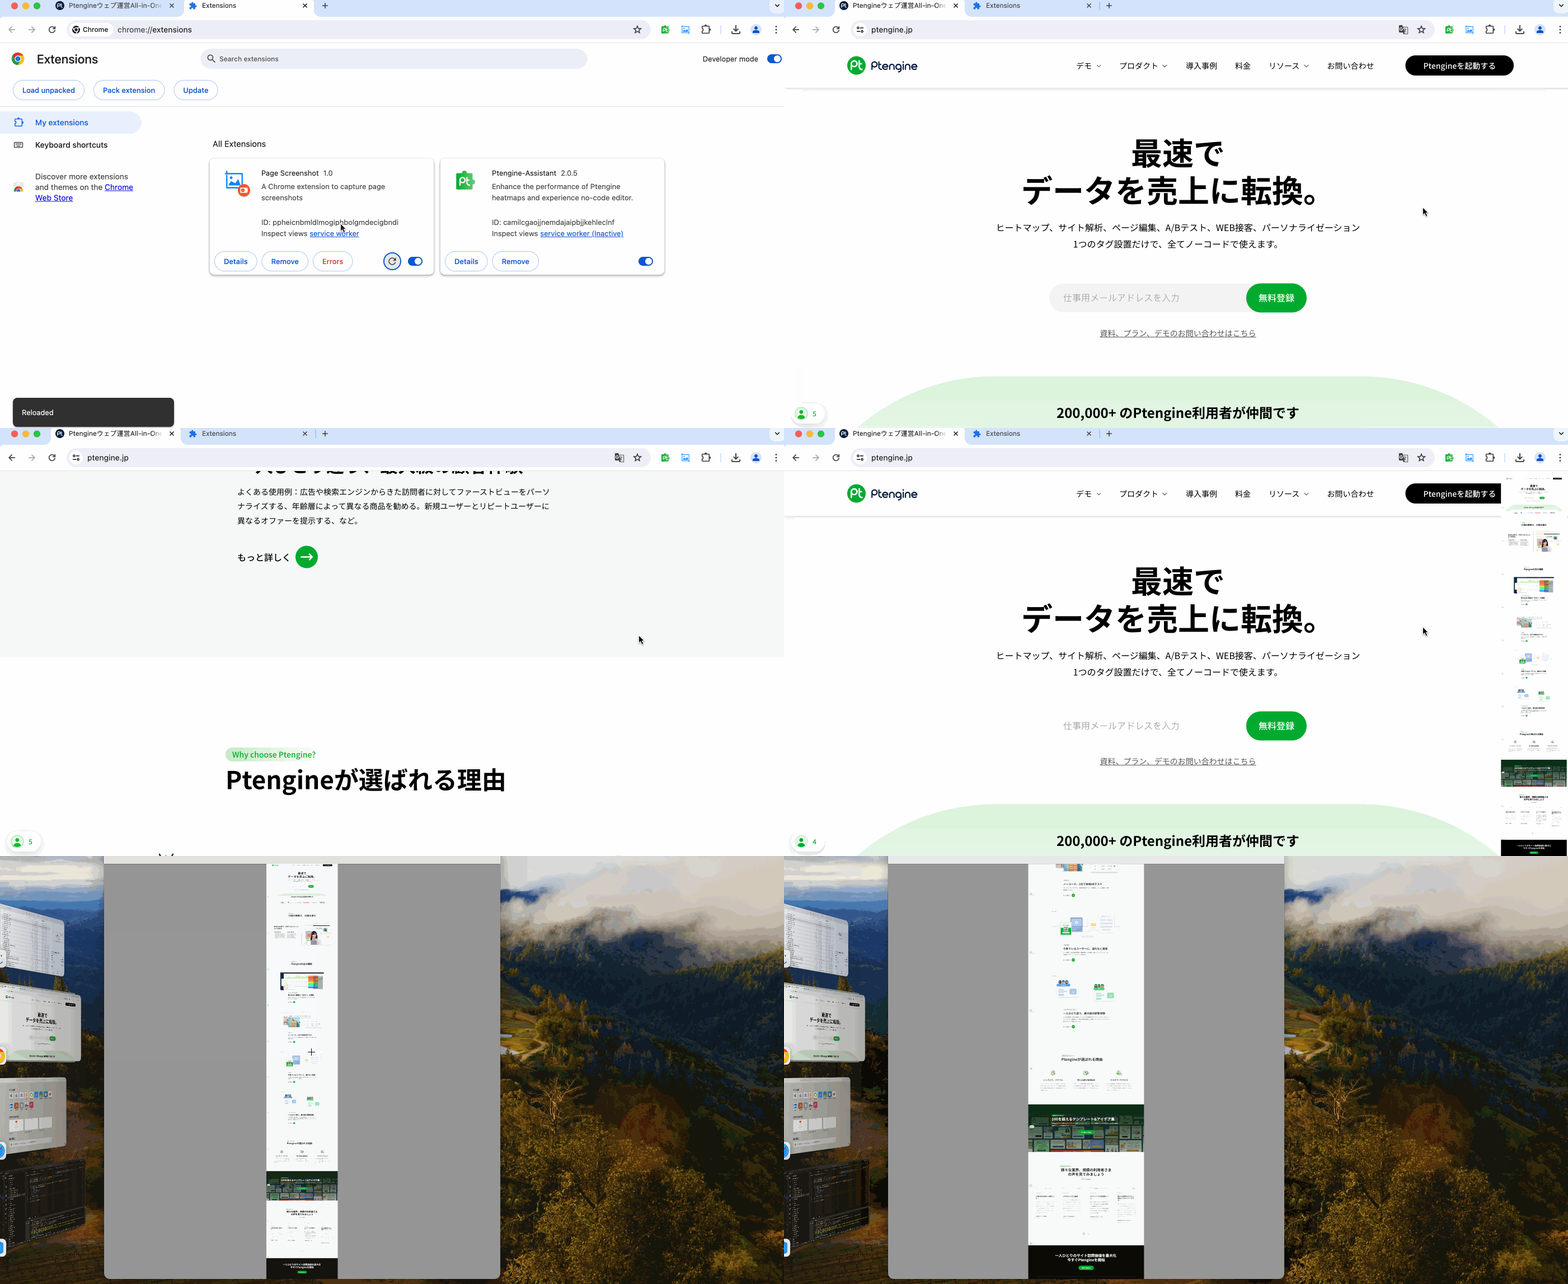
至此,你的 Chrome 截图插件就大功告成了!是不是很简单?赶快试试吧!让我们用自己的插件来捕捉精彩瞬间。
